本篇主要介绍java的事件处理
如果想要界面中的组件和用户实现交互功能,则需要进行事件处理。
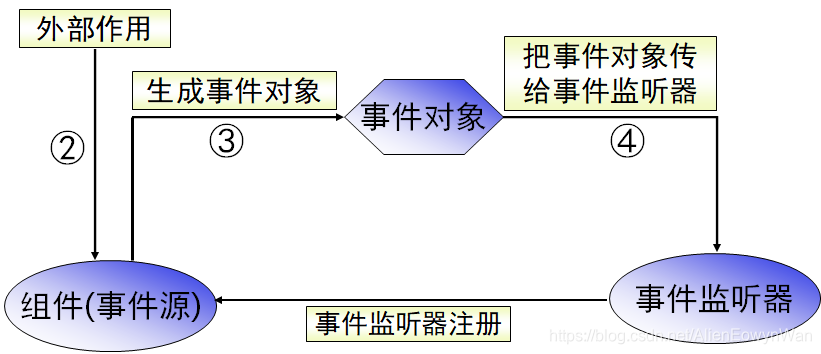
事件处理三要素
事件: 用户在组件上执行某种操作,如单击按钮、选中复选框等,就是一个事件,鼠标键盘以及系统状态的改变都会引发事件,当发生事件时,系统会创建一个相应事件类的对象。
事件源:就是事件发生的场所,通常就是各个组件。
事件处理者:一旦发生了事件,程序就要做出相应执行某种操作,对事件做出响应的对象就是事件的处理者,也称为监听器。
委托事件模型
委托事件模型:由事件源将事件处理权委托给某个对象(监听器)这种事件处理方式
同一组件上的不同事件,可以交由不同的监听器处理。
委托事件模型可以提高事件处理的灵活性。
事件处理的基本流程:
首先组件将事件的处理权委托给某个对象,这个过程成为注册,对象就是监听器,在程序运行过程中,如果在组件上发生了这个事件,那么系统就生成一个事件类的对象,并将这个对象传给监听器,监听器执行相应的事件处理代码。
每个事件类一般对应于一个事件监听器的接口,两者的名字的前半部分相同。
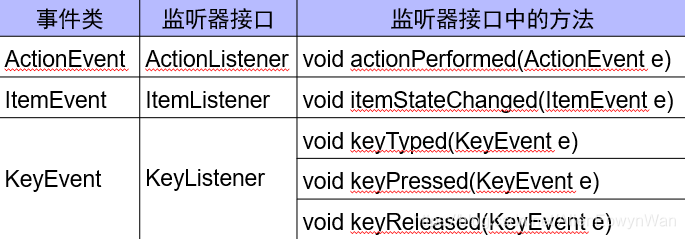
监听器要有监听和处理XXXEvent事件的能力,它所在的类必须要实现XXXListener接口。
监听器注册
所有的组件都从Component类中继承了将事件处理授权给监听器的方法(又称为“注册”)
格式:
1
| component.addXXXListener(listener);
|
XXX因事件的不同而不同,括号中的参数是监听器对象,如果是组件所在的类做监听器类,那么这里就写成this
例如:为button1注册监听器
1
2
| button1.addActionListener(new ButtonEvent());
button1.addActionLister(this);
|
取消注册:
1
| component.removeXXXListener(listener);
|
动作事件ActionEvent
当用鼠标单击按钮、复选框、单选按钮或者菜单以及在文本框中输入回车时都会触发ActionEvent事件
负责处理ActionEvent事件的监听器类必须实现ActionListerner接口,实现接口里的actionPerformed()方法。
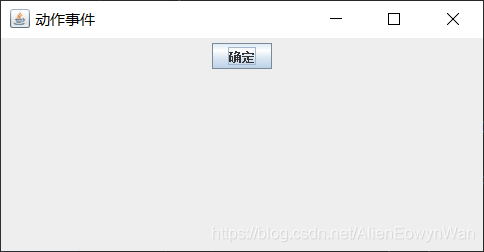
示例代码:
编写时候首先编写界面代码,组件包括框架和按钮,并对其进行必要的设置,在主方法中,创建这个类的对象即可。
在本类中定义:
1
2
3
4
5
6
7
8
9
10
11
12
13
14
15
16
17
18
19
20
21
22
23
24
25
| import javax.swing.*;
import java.awt.*;
import java.awt.event.*;
class EventDemo implements ActionListener
{
JFrame frame;
JButton button;
EventDemo(String title){
frame=new JFrame(title);
frame.setSize(500,260);
frame.setLayout(new FlowLayout());
button=new JButton("确定");
frame.add(button);
frame.setVisible(true);
button.addActionListener(this);
}
public static void main(String[] args) {
new EventDemo("动作事件");
}
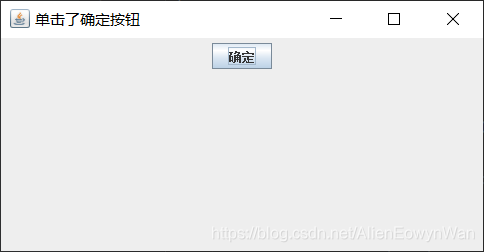
public void actionPerformed(ActionEvent e) {
frame.setTitle("单击了确定按钮");
}
}
|
单击确定按钮之后:
单独定义监听器类:
1
2
3
4
5
6
7
8
9
10
11
12
13
14
15
16
17
18
19
20
21
22
23
24
25
26
27
28
29
30
31
32
| import javax.swing.*;
import java.awt.*;
import java.awt.event.*;
class EventDemo
{
JFrame frame;
JButton button;
EventDemo(String title){
frame=new JFrame(title);
frame.setSize(500,260);
frame.setLayout(new FlowLayout());
button=new JButton("确定");
frame.add(button);
frame.setVisible(true);
button.addActionListener(new ButtonEvent(this));
}
public static void main(String[] args) {
new EventDemo("动作事件");
}
}
class ButtonEvent implements ActionListener{
EventDemo evd;
public ButtonEvent(EventDemo eventDemo){
this.evd=eventDemo;
}
public void actionPerformed(ActionEvent e){
evd.frame.setTitle("单击了确定按钮");
}
}
|
ActionEvent事件类的常用方法
public String getActionCommand()返回与此动作有关的命令字符串
public Object getSource()返回事件源对象,例如单击“确定”按钮,返回的是按钮对象名button
窗口事件与适配器类
示例代码:
1
2
3
4
5
6
7
8
9
10
11
12
13
14
15
16
17
18
19
20
21
22
23
24
25
26
27
28
29
30
31
| import javax.swing.*;
import java.awt.event.*;
class WindowEvendDemo{
public static void main(String[] args) {
JFrame frame = new JFrame();
frame.setSize(300,200);
frame.setVisible(true);
frame.addWindowListener(new QuitWindow());
}
}
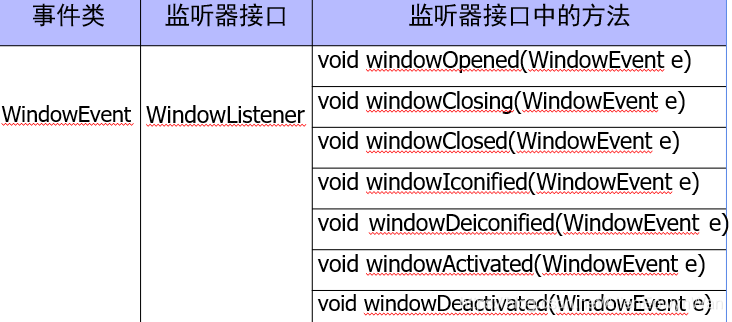
class QuitWindow implements WindowListener {
public void WindowClosing(WindowEvent e) {
System.exit(0);
}
public void windowOpened(WindowEvent e) {
}
public void windowClosing(WindowEvent e) {
}
public void windowClosed(WindowEvent e) {
}
public void windowIconified(WindowEvent e) {
}
public void windowDeiconified(WindowEvent e) {
}
public void windowActivated(WindowEvent e) {
}
public void windowDeactivated(WindowEvent e) {
}
}
|
我们注意到,写的时候必须实现WindowListerner接口中的所有方法,这样很麻烦,所以我们要使用适配器来解决这个问题。
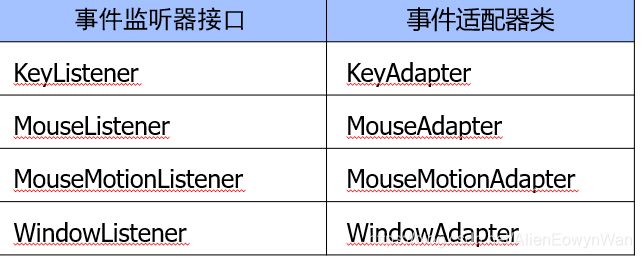
常用适配器类
可见,上述代码就可以简化成如下版本了
1
2
3
4
5
6
7
8
9
10
11
12
13
14
15
16
17
| import javax.swing.*;
import java.awt.event.*;
class WindowEvendDemo{
public static void main(String[] args) {
JFrame frame = new JFrame();
frame.setSize(300,200);
frame.setVisible(true);
frame.addWindowListener(new QuitWindow());
}
}
class QuitWindow extends WindowAdapter {
public void WindowClosing(WindowEvent e) {
System.exit(0);
}
}
|
继承适配器类的处理
一些监听器接口有适配器类,事件处理类可以继承事件所对应的适配器类,只需要覆盖必要的方法,无关方法不用实现
优点:提供了一种简单的实现监听器的手段,可以缩短程序代码
缺点:由于适配器是一个类而不是接口,因而处理事件的类只能继承一个适配器,当该类需要处理多种事件,需要多种监听器或此类已有父类时候,通过继承适配器类的方式是不可以的。
使用内部类与匿名类进行事件处理
内部类
外部类可以通过内部类的对象,引用内部类的成员。
内部类可以直接引用外部类的成员
例如:
用内部类实现窗口关闭事件
1
2
3
4
5
6
7
8
9
10
11
12
13
14
15
16
17
18
19
20
21
| import javax.swing.*;
import java.awt.event.*;
class WindowEvendDemo {
WindowEvendDemo() {
JFrame frame = new JFrame();
frame.setSize(300, 200);
frame.setVisible(true);
frame.addWindowListener(new QuitWindow());
}
class QuitWindow extends WindowAdapter {
public void WindowClosing(WindowEvent e) {
System.exit(0);
}
}
public static void main(String[] args) {
new WindowEvendDemo();
}
}
|
匿名类
所谓匿名类就是该类没有类名
如果在程序中只创建内部类的一个对象,并且该内部类需要继承一个类或者实现一个接口,这是,可将内部类定义成匿名类
由于匿名类本身无名,因此就没有构造方法,它需要显式地调用父类或接口的构造方法
匿名类不能定义静态的成员
匿名类不能用4种权限、static、finally、abstract修饰
只可以创建一个匿名类实例
匿名类要覆盖父类的方法或实现接口中的方法
鼠标和键盘事件
Graphics类
1
2
3
4
5
6
7
8
9
| Graphics g = component.getGraphics()
g.drawLine(int x1,int y1,int x2,int y2)
g.drawOval(int x,int y,int width,int height)
g.drawRect(int x,int y,int width,intheight)
g.fillOval(int x,int y,int width,int height)
g.drawString(String str,int x,int y)
clearRect(int x,int y,int width,int height)
Color getColor()
void setColor(Color c)
|
鼠标事件
鼠标事件类MouseEvent
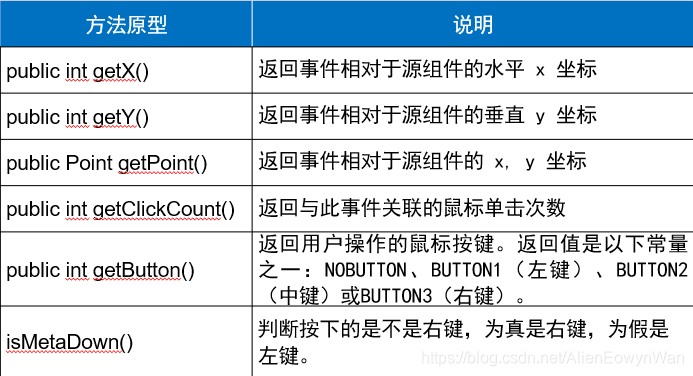
鼠标事件接口MouseListener和MouseMotionListener
MouseListener:

对应的注册监听器的方法是addMouseListener()
mouseEvent.isMetaDown()可用来检测按下的是鼠标左键还是右键,为真是右键,为假是左键。
MouseMotionListener:

示例代码:
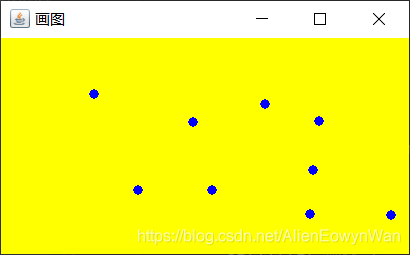
通过单击鼠标来画蓝色的圆点:
1
2
3
4
5
6
7
8
9
10
11
12
13
14
15
16
17
18
19
20
21
22
23
24
25
26
27
28
29
30
31
32
33
34
35
36
37
38
39
| import javax.swing.*;
import java.awt.*;
import java.awt.event.*;
class DrawPoint extends JFrame implements MouseListener{
Graphics g;
JPanel pane;
DrawPoint(){
setTitle("画图");
setVisible(true);
setSize(300,200);
setForeground(Color.BLUE);
pane=new JPanel();
add(pane);
pane.setBackground(Color.YELLOW);
pane.addMouseListener(this);
}
public static void main(String[] args) {
DrawPoint t = new DrawPoint();
}
public void mouseClicked(MouseEvent e) {
g = pane.getGraphics();
g.fillOval(e.getX(),e.getY(),10,10);
}
public void mousePressed(MouseEvent e) {
}
public void mouseReleased(MouseEvent e) {
}
public void mouseEntered(MouseEvent e) {
}
public void mouseExited(MouseEvent e) {
}
}
|
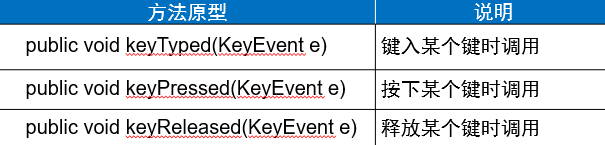
键盘事件
键盘事件类KeyEvent:

对应的监听器接口KeyListener:
常用KeyEvent类:
1
| public char getKeyChar()
|
返回该事件中键的字符
例如shift+a按键事件返回值为A
返回键盘上实际键的整数代码
1
| public static String getKeyText(int keyCode)
|
返回描述键代码的字符串
例如HOME F1 A等等
示例代码:
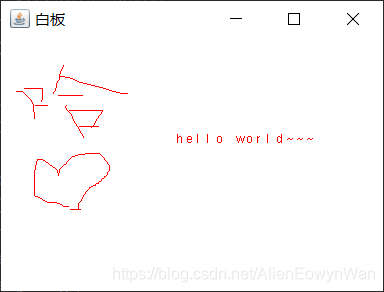
综合鼠标事件和键盘事件,模拟一个电子白板,可以用鼠标在上面绘画,用键盘在上面写字。
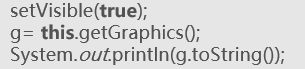
由于多个方法中都会使用绘图对象g,因此可以在成员变量中声明g,这样各个方法中就不用重复声明和创建了,但要注意创建g时一定要在setVisible(true)方法的后面,否则就创建不成功。
1
2
3
4
5
6
7
8
9
10
11
12
13
14
15
16
17
18
19
20
21
22
23
24
25
26
27
28
29
30
31
32
33
34
35
36
37
38
39
40
41
42
| import javax.swing.*;
import java.awt.*;
import java.awt.event.*;
class MouseAndKeyDemo extends JFrame{
int lastX = 0,lastY = 0;
public MouseAndKeyDemo() {
super("白板");
getContentPane().setBackground(Color.WHITE);
setForeground(Color.RED);
setSize(400, 300);
setVisible(true);
setDefaultCloseOperation(JFrame.EXIT_ON_CLOSE);
addMouseListener(new MouseAdapter() {
public void mousePressed(MouseEvent e) {
lastX = e.getX();
lastY = e.getY();
}
});
addMouseMotionListener(new MouseMotionAdapter(){
public void mouseDragged(MouseEvent e){
int x=e.getX();
int y=e.getY();
Graphics g = getGraphics();
g.drawLine(lastX,lastY,x,y);
lastX=x;
lastY=y;
}
});
addKeyListener(new KeyAdapter() {
public void keyTyped(KeyEvent e) {
String s = String.valueOf(e.getKeyChar());
getGraphics().drawString(s, lastX, lastY);
lastX += 10;
}
});
}
public static void main(String[] args) {
new MouseAndKeyDemo();
}
}
|
完结撒花 ~